Our love of flowers is no secret. We can’t always explain why, but they make us happy. They’re bright, fresh, smell really good, and are unequivocally beautiful. Even the most questionable looking (i.e. ugly) ones have a wonderfully charming quality to them, even if they may not be our first choice in terms of decor.
It seems that this sentiment is gaining, at least among the fashion conscious – as more and more people are choosing to wear flowers on their head. Not just a single flower tucked behind the ear, but full on head gear. From what we can tell, floral crowns are making a resurgence, leaving the confines of Coachella and making their way onto the runway, in music videos, and even onto the heads of men.
We bring up this particular trend only because the floral crown, or wianek, has been a staple in Polish culture for centuries, if not more. In pre-Christian times, it was thought that headdresses made from twigs, leaves, and flowers would protect girls from evil spirits. And in more recent history, the wianek has come to characterize girlhood and innocence.
For any and all special occasions, girls and unmarried women wore wreaths made of herbs and flowers on their heads; and depending on the occasion, specific flowers or herbs thought to have magical qualities would take prominence in the design (i.e. lavender and myrtle are usually associated with love, rosemary with fidelity). As a result, it was not uncommon for girls to keep their own garden of herbs and flowers to supply themselves with the necessary materials. It wasn’t until marriage, during a ceremony called oczepiny, in which the bride’s wreath was removed and replaced with a traditional marriage crown.
So whether you want to wear a wianek to your next Polish celebration or just want to channel your inner floral fashionista – we’ve got a handy DIY tutorial to get you started.
What You Need
Assorted flowers (fresh or artificial – though we would vote fresh any day)
Rustic Floral Wire
Floral wire – 22 gauge
Green floral tape
Ribbon
Measuring tape
Scissors
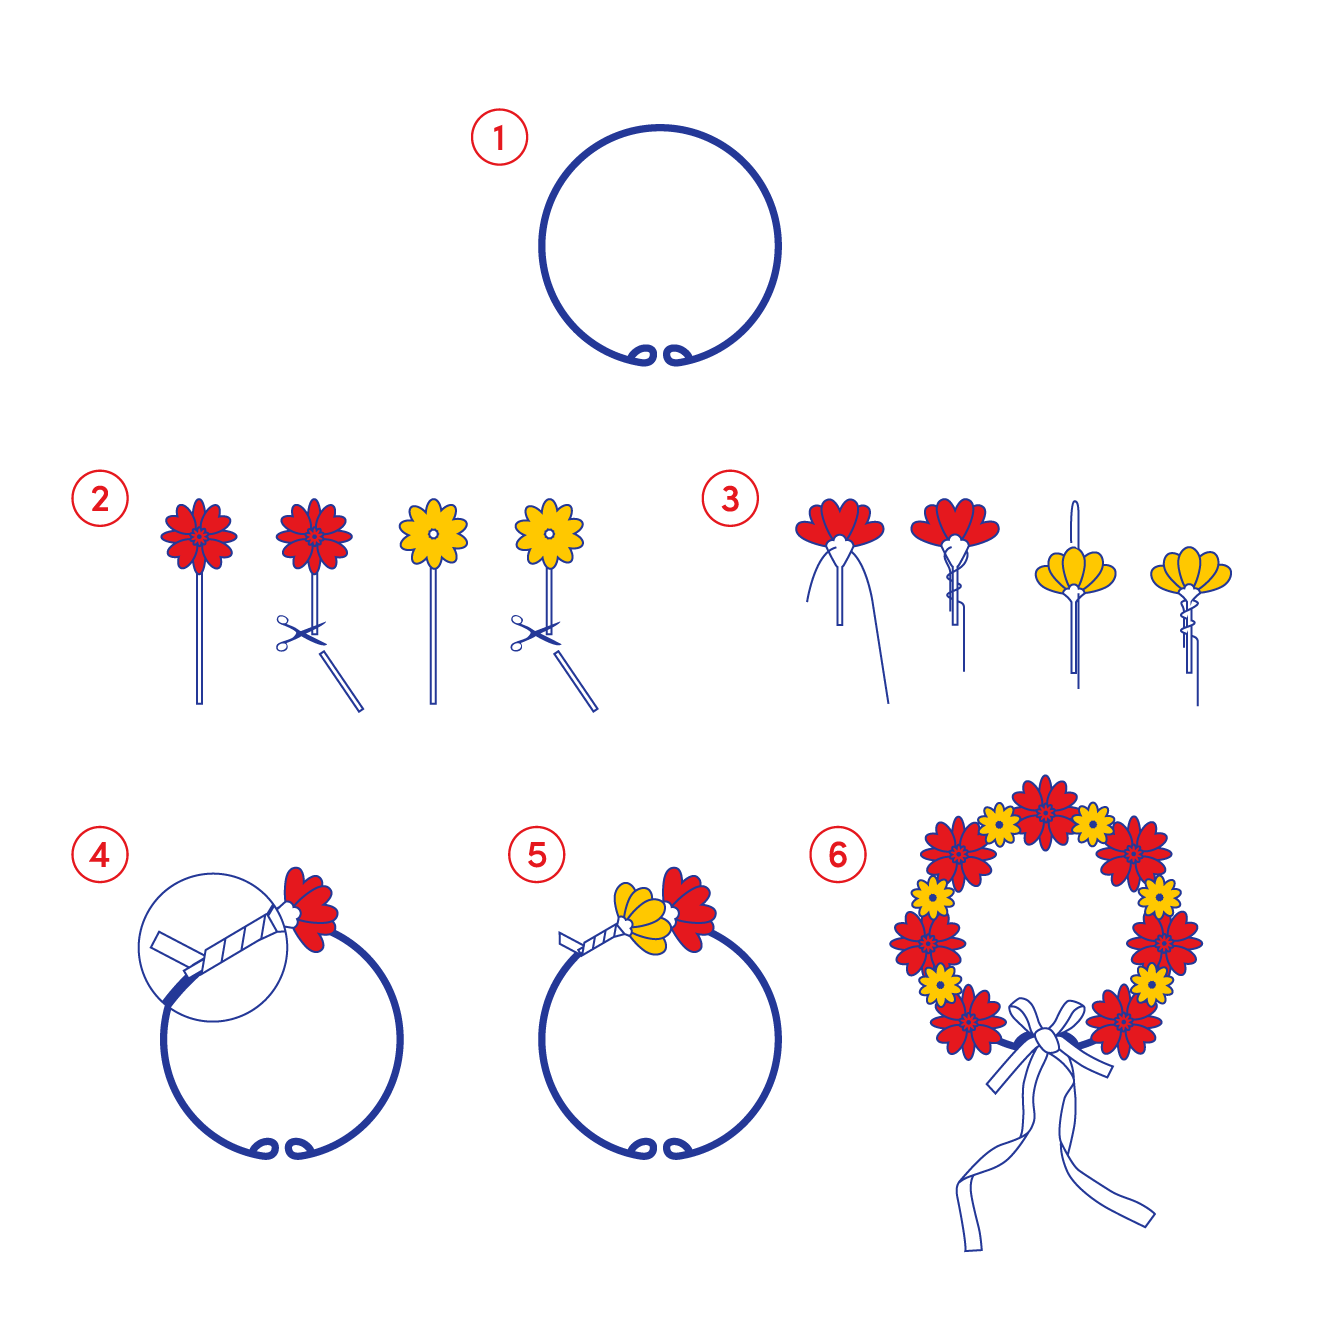
1. Create the crown’s base by measuring the circumference of your head (where you want the floral crown to lie). Cutting a length of rustic floral wire about 1.5 inches longer than the measured length, bend each end of the wire to form a closed loop, and shape the length of wire into a circle.
2. Trim the stems of all the flowers to about 2 inches in length.
3. If using fresh flowers, prepare individual blossoms by securing them with the thin green floral wire. Technique will vary depending on the type of base the flower has. Refer to the diagram to the left and the following instructions. For blossoms with a thick, bulbous base (i.e. roses or carnations), pierce the base with one end of the wire, bend one end down parallel with the stem, and wind the other end around both the stem and wire. For blossoms with large flower heads and thinner bases and stems (daisies, asters, chrysanthemums), pierce wire up through the base and out the top of the flower. Bend the wire into a downwards hook, push back into the flower, and wind the other end of the wire around both the stem and wire.
4. Time to attach the flowers! Take an individual flower and position it so that the stem runs parallel to the wire base. Secure by wrapping everything together tightly with green floral tape.
5. Continue with additional flowers until the whole crown is filled with flowers.
6. Attach two strands of ribbon to the small loops at the ends of the base and cut to your desired length. The crown is now ready to wear!